Key Products
- Noise S.T.O.P. FabrisorbTM
- FabriWall Acoustic Panel
- D'ecopanel Acoustic
- Sound Barrier
- FOAM STOPTM Polyurethane
- FOAM STOPTM SoundWave
- EnviorocousticTM Wood Wool
- Ploy MaxTM Polyester Acoustics
- WoodTEC Acoustic Panels
- AcoustyFABRIC
- Polysorb Acoustics
- AcoustyDOOR
- Duct Sound
- Noise STOPTM Acoustimetal””
- MetalineTM
Featured Products
Product Line
- Absorptive Quilted Curtains
- Acoustical Foam Panels
- Acoustik Underlayment
- Acoustic Windows
- Adjustable Jamb Seals
- Barrier – Decoupler
- Barrier ACT Ceiling Tiles
- Barrier-Backed Ceiling Tiles
- CFAB Cellulose Panels
- Climate Seal Window Inserts
- Cotton Soundwave Eggcrate Panels
- Curve Panels
- dBa Ceiling Ceiling Tiles
- Duracoustic
- Echo Eliminator Baffles
- Exterior Quilted Barrier/Absorbers
- Glasswool Ceiling Tiles
- Green Glue Damping Compound
- Heavy Duty Door Seal Kits
- Magnetic Astragal
- Melamine Composite Panels
- Painted Nubby Fiberglass Tiles
- PVC and Sailcloth Baffles
- Pyramid Diffuser
- Quiet Floor NP
- Quiet Floor Walk
- Quilted Exterior Absorbers
- RSIC-1 Clips
- RSIC-1 Ext04 Clips
- Rubber Isolation Hangers
- Sonex One
- Sound Silencer Baffles
- Sound Silencer™ Ceiling Tiles
- Spring Isolation Hangers
- Spring Isolation Mounts
- Squareline Ceiling Tiles
- Standard Door Seal Kits
- Stud Isolators
- Studio 3D Doors
- Studio Windows
- Super W Pads
- Tecsound Acoustic Membrane
- Ultra Touch Insulation
- Whisper Wave Clouds


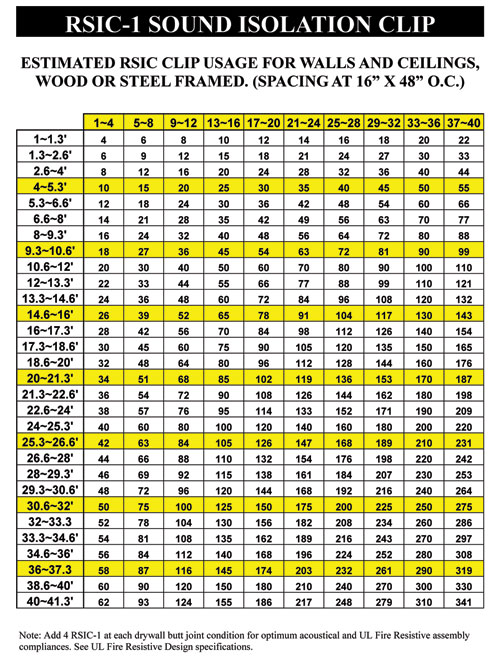
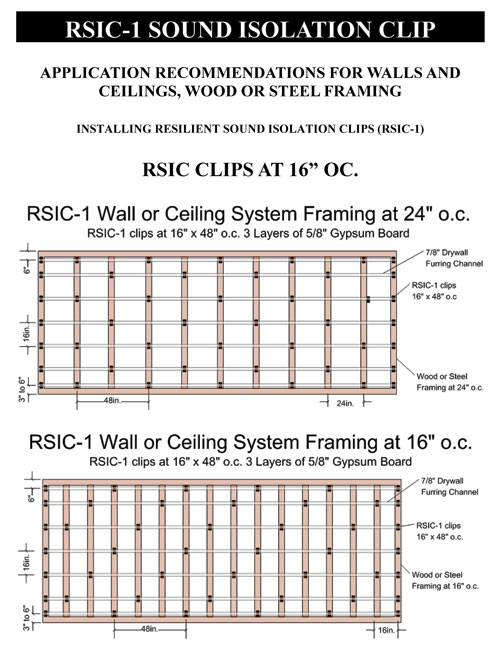
Resilient Sound Isolation Clips RSIC-1
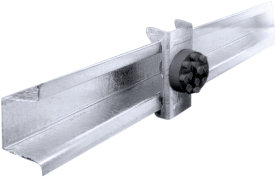
For Wall & Floor Ceiling Assemblies

The RSIC-1 Resilient Sound Isolation Clip
RSIC-1 Resilient Sound Isolation Clips provide 2 unique approaches to sound privacy that will prevent sound from noisy neighbors transmitting through your walls or floor/ceiling assemblies.
Experience with the RSIC-1 Clips has recorded remarkable improvements of up to an additional 20 STC points on walls.
The RSIC-1-R designed to retrofit and improve existing walls and ceilings has shown to improve existing walls by as much as 8-10 dB by actual field tests.
Product Testing & Information

Walls – One and Two layers of 5/8″ Gypsum Board
- Resilient Sound Isolation Clip (RSIC-1) shall be 48 inches maximum on center (horizontal)
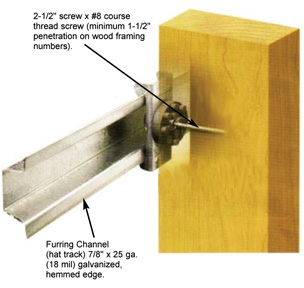
- Fasten the Resilient Sound Isolation Clip (RSIC-1) to the substrate with a fastener approved for a minimum pull-out and sheer of 120 lbs
- Ensure the internal metal ferrell is tight to the substrate
- Locate the first row of RSIC-1 clips within 3 inches from the floor and within 6 inches from the ceiling
- Snap in the drywall furring channel (hat track) into the RSIC-1 clips (horizontal for walls)
- Place 1/4″ (minimum) shim on floor to fully support the gypsum board
- Install the gypsum board from the bottom up leaving a 1/4″ min. gap around perimeter.
- ONLY remove the shims after ALL the gypsum board is completely screwed to ALL the drywall furring channels. Make sure every screw (floor to ceiling and wall to wall) is installed as required by the assembly design, in every layer of gypsum board before removing the shims at the floor. The shims are critical to ensure best results
- Caulk around the entire perimeter of the gypsum board. Use fire and smoke rated acoustical sealant where required

 Our Products
Key Products
- Noise S.T.O.P. FabrisorbTM
- FabriWall Acoustic Panel
- D'ecopanel Acoustic
- Sound Barrier
- FOAM STOPTM Polyurethane
- FOAM STOPTM SoundWave
- EnviorocousticTM Wood Wool
- Ploy MaxTM Polyester Acoustics
- WoodTEC Acoustic Panels
- AcoustyFABRIC
- Polysorb Acoustics
- AcoustyDOOR
- Duct Sound
- Noise STOPTM Acoustimetal””
- MetalineTM
Featured Products
Product Line
- Absorptive Quilted Curtains
- Acoustical Foam Panels
- Acoustik Underlayment
- Acoustic Windows
- Adjustable Jamb Seals
- Barrier – Decoupler
- Barrier ACT Ceiling Tiles
- Barrier-Backed Ceiling Tiles
- CFAB Cellulose Panels
- Climate Seal Window Inserts
- Cotton Soundwave Eggcrate Panels
- Curve Panels
- dBa Ceiling Ceiling Tiles
- Duracoustic
- Echo Eliminator Baffles
- Exterior Quilted Barrier/Absorbers
- Glasswool Ceiling Tiles
- Green Glue Damping Compound
- Heavy Duty Door Seal Kits
- Magnetic Astragal
- Melamine Composite Panels
- Painted Nubby Fiberglass Tiles
- PVC and Sailcloth Baffles
- Pyramid Diffuser
- Quiet Floor NP
- Quiet Floor Walk
- Quilted Exterior Absorbers
- RSIC-1 Clips
- RSIC-1 Ext04 Clips
- Rubber Isolation Hangers
- Sonex One
- Sound Silencer Baffles
- Sound Silencer™ Ceiling Tiles
- Spring Isolation Hangers
- Spring Isolation Mounts
- Squareline Ceiling Tiles
- Standard Door Seal Kits
- Stud Isolators
- Studio 3D Doors
- Studio Windows
- Super W Pads
- Tecsound Acoustic Membrane
- Ultra Touch Insulation
- Whisper Wave Clouds